I am a very last minute kind of person when it comes to gifts, I don't know why but I just never seems to have enough time for anything, so I came down to either bad time management, or that I get easily distracted by everything else. I manage to finish these pretties in two days and send them in two days before the September holiday starts. Each one can easily be done in an hour and I actually got compliments from the teachers the following day. YAY ME!

Bought the cute animal cups from Popular.

Got some printables from the net, gave them to princess and told her to go crazy with it... and she did.
LOL!
As I mentioned, its kind of last min, I didn't have any wrapping papers in hand so I used some pastel A4 papers laying around.
This time I actually did scout the net for a pattern but did not find what I wanted so I made this up on my own, YAY! a pattern of my own! ok fine, its very simple, but still... *feeling proud* hehe.
What I like about this is no sewing and there's only 2 tails to weave in, the one from the leaf tip, and the ending tail from the flower, provided that you crochet your beginning tail as you go. I hate sewing, SUPER DUPER HATE TO THE CORE! I suck at it so whether it's a little or a lot, I just hate it, I find that anything that requires me to sew ends up looking awful. I'm quite sure in future if I do start designing my own patterns, I'll probably find all sorts of weird ways to minimize sewing.
OK, enough of blabbering, here's the pattern. :D
Pen cozy with flower and leaf
Materials:
Worsted weight yarns, I used Caron Simply Soft Pistachio for stem and leaf and Watermelon, Grape and Blue Mint for flowers
Size H hook or whatever size to achieve gauge
Needle for weaving in ends
Embellishments for flower center and necessary adhesive e.g. glue gun
stitch marker for beginning of round.
Gauge:
4 sc by 5 rows = 1 inch
Stem pattern:
ch 5, sl st to join
Sc on each chain and continue to sc for 15 rounds (75 sc) or til preferred length for stem, sl st into next sc, do not cut yarn.
Leaf pattern:
Ch 6, sl st into 1st ch from hook, sc 1, hdc 2, 2dc in next ch, dc in last ch, ch 3, sl st into same ch as last dc, ch 3, do not turn but rotate your work and continue to make the other half of leaf
dc into same ch as last dc and sl st, 2dc in next, hdc 2, sc 1, sl st into last ch.
Finish off and cut yarn.
you stem and leaf should look like this:

Flower pattern:
NOTE: for Round 1, pick up stitches from the last round of stem from the inside (see photos), this joins the flower to the stem without the need to sew it on later.
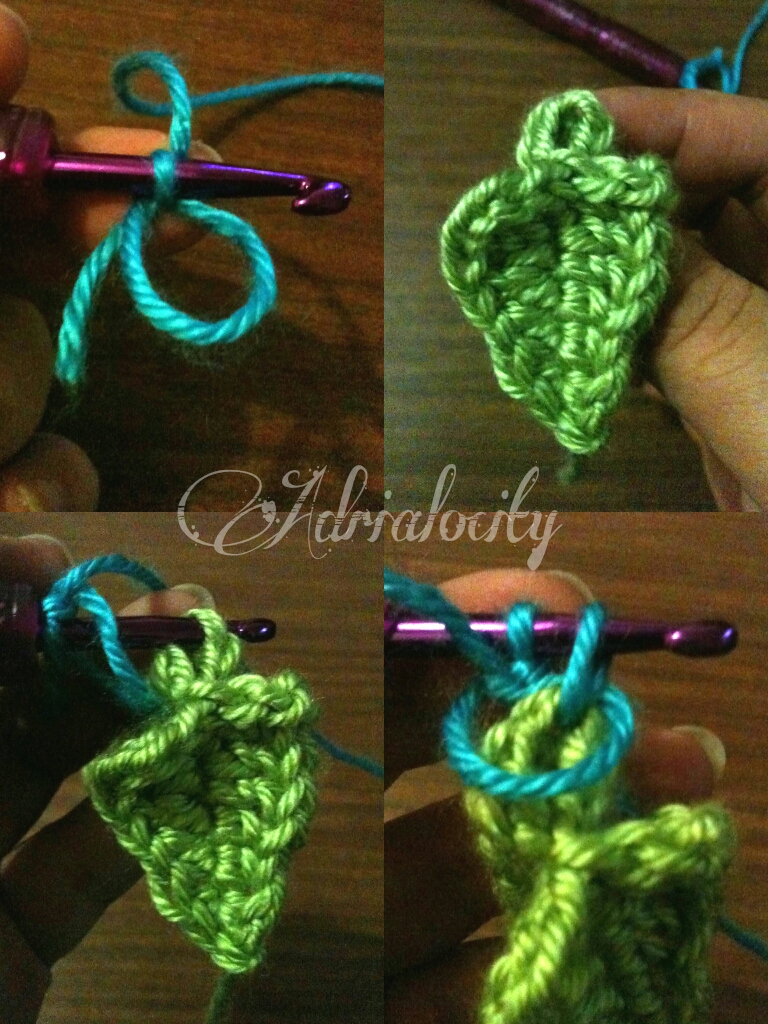
Round 1: Start with adjustable ring, make a ch and pull it tight, then make another ch (top left), insert hook into adjustable ring, pick up the stem (top right) and insert hook into one of the sc on stem (bottom left), yo, pull through stem's sc and adjustable ring (bottom right), yo, pull through both loops, 1st sc made. continue in same manner 5 more times (6scs)

sl st to 1st sc and tighten the ring.
Round 2: Ch 1, *sc, ch 1, 3dc, ch 1, sc* all in the same stitch as ch 1, 1st petal form. Repeat * in the next 5 sc.
Round 3: *Sl st in 1st sc of petal, ch 2* repeat for the next 5 petals, sl st into 1st ch 2.
(I use ch 2 because I want the 2nd layer petals to be as close to the stem as possible, if its too tight, you can ch 3 instead.)
Round 4: Ch 1, *sc, ch 1, 4dc, ch 1, sc* into the same ch 2, repeat * in the next 5 ch 2s, finish off and cut yarn.
Weave in all ends.

Embellishments:
I hot glued small button to the center of flower, you can pretty much use anything you like and either hot glue or sew them onto the flower.

I got the pens from Popular Bookstore, The cozy should fit any standard pen with cap.
That's it! Wrap it up and gift away or enjoy it as your own. XD
Thank you so much for this pattern! It's teacher appreciation week for us and I was looking for something different, something that would last. I saw a pattern for something similar on Facebook, but it wasn't what I wanted. When I did a search, I found your pattern. It is perfect. I made 10 of these in one weekend (probably could have done it in less time, but I did it some here and there). They will make an adorable bouquet for my son to give to his teacher and assistant tomorrow.
ReplyDeleteYou're welcome! I'm glad you find it perfect! Sorry for the late reply but I don't really go on to the virtual world much. Imagine my excitement when I found out someone actually used my pattern XD lol
Delete